Monday, November 28, 2011

Christmas decor.


And here are my Christmas shelves!
They're kinda boring.
Well, to me they are.
I will probably add more to them as I accumulate more decor.


But my house is all clean and the rest (not pictured) has been decorated and is looking really festive!
I love Christmas! :D
OH, and my house smells like a Christmas tree even though we don't have one yet. 
Thank you, Bath & Body Works! 

PS, here's a hint for my next post:
What is something you might use EVERY DAY until Christmas? 
Be on the look out! 

Friday, November 18, 2011

Next week!

If you have any awesome cake pop recipes - send them to me!
Next week I'm going on my second attempt to master cake pops.

The first time I made them was last Christmas. It was my former boyfriend's Christmas party and I made them into snowball heads. (Minus the sticks since they didn't stay together)
They were okay but I got a lot back and normally they eat everything I give.
So I knew I messed up!
I think (looking back) that I added too much frosting. 

So this time, I will use a recipe and make sure I do it word for word! 
Once I make them, I will definitely share with you all.

And to keep you entertained ..
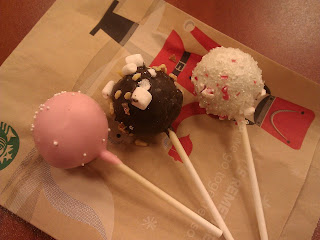
Here's my inspiration.
Starbucks Cake pops! Yummm!


Thursday, November 17, 2011

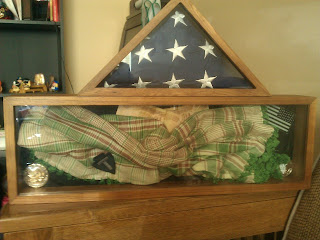
Army pride!


My best idea this month, I think! :) 
Carlos came into town for a month. When he got here, he brought goodies for the kids from his deployment to Iraq.
The flag flew in Iraq so he bought the holder for that.
Then we went and bought the long shadow box to add the rest of the little stuff.

You can't really see the second coin (bottom right corner) but it's there.
There's two coins that he earned.
A scarf he wore overseas to protect his face from sand storms.
Two badges of his.
And in the middle is Iraqi money.

I pinned everything with needles you use in sewing .. those real thin ones that hold two pieces of fabric together? Yeah, those.
We did have to hot glue the coins onto the backing because there was no way the coins were going to stay up unless we did.

Anyways - both are now hanging in the hallway.
We're going to add a picture of Carlos, maybe.
Plus he's going to mail one of his badges that says his last name to add to the shadow box.


PS,
It's almost time to start creating Christmas crafts.
Are you excited??


Friday, November 11, 2011

Showing off the arts! :)


Easy DIY project! :) 
I have some all-purpose white yarn that I keep around. I use it for everything! 
I had just moved into my new place and I love showing off the kids art work .. so I sat and thought about what I could do to show it off.
I grabbed some of my white yarn and tacked it up with white tacks. 
I attached clothespins onto the string and clipped on various pieces of art.

I change out the kids art work every week .. especially since Dylan brings me home such goodies! :)


Monday, November 7, 2011

If you're a fan ..


If you're creating any recipes/projects we do, please send pictures! 
I'd love to see them and give you credit :) 


My email is d.squarede@yahoo.com 

Keep 'em coming! 
Love you all :) 

Our favorite people!


I love that everyone is enjoying our Thankful Turkey!
Dylan's first little girlfriend, Jayla, made this.
Obviously she isn't little anymore - she made this all by herself!
Such a creative little thing! So proud :) 


Sunday, November 6, 2011

Tostados!


Tostados!

This is one of my favorite "go to" recipes. So simple and so delicious.
I have to thank my ex-husband and his family for showing me how to make this! 
So thank you, Carlos & family!
(I wish I had written down how to make more of the awesome dinners his mom made!)

1 package (1 lb) chicken breasts
1 chicken bouillon cube
1 package corn tortillas
4 (or however many you want) avocados
lettuce, shredded
1 can refried beans
1 package queso blanco 
vegetable oil

1. Heat enough oil to cover a corn tortilla, in a small fry pan.
2. Once heated, add one tortilla at a time until they're brown. Do one side at a time, flip and do the other. Place onto a baking sheet lined with paper towels when they're brown.
3. While you're doing the tortillas, throw the chicken into a pot of water. (Enough to cover) Add the bouillon cube. Let it simmer until the chicken is cooked all the way through.
4. Once the chicken is cooked, shred it and put it aside.
5. Heat the beans all the way through in a small pot.
6. Cut up and mash the avocados. Add any spices that you desire.
7. Once everything is done, go ahead and assemble your tostado!
8. Begin by grabbed a tortilla in your hand. It should be crunchy.
9. Cover it in the beans. Then the guacamole.
10. Add some shredded lettuce on top of that.
11. Then the chicken. 
12. Finish off with some shredded queso blanco and you're good to go!


Yummy Frosting!

Sorry, no awesome picture to go with this one.
BUT the long awaited frosting recipe.

Before I start, get your tools ready ..
Recipe card
Pen/Pencil (Whatever you prefer)

Are you ready?
Got your tools?
Ok.
Here it is.

1 stick of Crisco (they sell them in a 3 pack at Walmart - blue label)
1 stick of UNsalted butter, softened
1/2 teaspoon vanilla extract
1/4 teaspoon almond extract
1/4 teaspoon butter flavor
1/4 teaspoon salt
1 lb powdered sugar

1. Mix Crisco and butter till they're both combined. Doesn't need to be perfect just as long as they aren't solid sticks anymore.
2. Add vanilla, almond and butter flavor. (OH - and salt too!)
3. Slowly add sugar. (Don't do it all at once. Add a half up here, a cup there, half a cup here .. etc.)
4. Once it's all combined, frost your favorite cuppycakes and enjoy!

*If frosting seems a little dry, as it does when I use my Kitchen aid, add a splash of milk and mix well.

Saturday, November 5, 2011

Orange Cuppycakes!


I'm saddened to admit that the batter is not homemade. :( 
I know. I know. I heard you gasp too. 

BUT I was rushed to get them done for Dylan's class party.
Dylan turned 5 yesterday, November 4th.
He was able to bring in cupcakes to class, but since we were in Legoland the day before, I waited till the morning of to actually bake.
But they were a hit!
I used a box of White cake mix.
I did dye the batter orange, obviously.
I baked as directed and let them cool.

(I made the frosting myself - which I'll post a recipe for next.)
I then frosted them and rolled them around in orange sprinkles.

And there you go!
Keep an eye out for the frosting recipe - it's a must try! 

Necklace hooks.


I love accessories.
I especially love necklaces.

Once I moved into my new place, I wanted them to be more organized.
Throwing them all into a travel bag wasn't cute. Especially when you're running late and need a necklace fast!
SO.
I was sucked into those Command commercials.
Those people know how to advertise their hooks! 
So I went to Target and bought a couple packs.
My dad helped me put 'em on one day, although I'm sure I could have done it myself. Haha.
I let them sit (as directed) for several hours.
I put on the necklaces and so far they've worked for 3 months now! 

Awesome hooks if I do say so myself! 
Go buy some! 

Thanksgiving Decor is up!


I must start off by saying, I love my shelves.
They're pretty small but can hold so much.

So these are my shelves with all of their Thanksgiving decor.
I got the wreath at .. um .. Home Goods? Big Lots? Target? One of the above. Haha.
I got the cute little TY beanies -turkey, pilgrims & pumpkins - at Barnes & Noble. (Thank you, after holiday clearance).
The frames are from Target with pictures of my beautiful babies in 'em.
(The shelves & cubes are from Target as well.)
And the turkey to the right is from Beall's. (A Florida chain, I believe, in case you're wondering what I'm talking about.)

I cannot wait for Thanksgiving! 

Thankful Turkey!


This is our Turkey.
His name is .. uh .. Thankful Turkey!
Yeah, that's it. Thankful Turkey.

We (we, meaning my children and I) made Thankful Turkey this morning.
I saw this really beautiful fabric tree in a Pottery Barn Kids catalog. The tree was covered in numbered pockets so that every day in November, children could put a piece of paper in it saying what they were thankful for.
I was so in love with the item until I saw the price tag at $69!
I knew I could make something myself, and why a tree?
What's more representative of Thanksgiving than a turkey?

So off I went to get construction paper, glue & scissors.
I free-handed the entire thing.
I did a semi-circle on two different pieces of brown paper to make his body.
I grabbed a sheet of paper in various colors for the feathers.
A quarter of a sheet of brown paper for the head. (Which I think is still too oval, but oh well!)
A scrap piece of red paper for the jiggly thing below his head. (Haha. Jiggly thing - you know you like that name!)
I drew on the eyes and used scrap paper for the mouth and tiny legs.
I put another piece of brown paper (cut to match up with the body) for the "pocket".
PS, I attached everything with Tacky Glue (my favorite!).

Right after I completed it and hung it up, I sat with my babies and asked them what they were thankful for.
Dylan promptly responded with "Mater & Acer" - two of his birthday gifts he got last night that he was playing with when I asked him about this.
And Emma kept saying "I don't know. I don't know" until I gave her some examples. Then she told me her "babydoll". Haha. Silly kids!

But I'm very happy with it.
It didn't cost me a dime and I was able to construct it in no time!
I hope you enjoy! 

Let me start off by typing this -

So I'm starting this blog in hopes of sharing it with all of my friends and family.

I enjoy arts & crafts, alot.
And baking even more!

This blog will be full of pictures & how-to's in case you all want to do the same things I'm doing.


So, I hope you all enjoy!